Support the Dogecoin network by running your own full node.
Support the Dogecoin network by running your own full node.1
A full node is a program that fully validates transactions and blocks. Almost all full nodes also help the network by accepting transactions and blocks from other full nodes, validating those transactions and blocks, and then relaying them to further full nodes.
Most full nodes also serve lightweight clients by allowing them to transmit their transactions to the network and by notifying them when a transaction affects their wallet. If not enough nodes perform this function, clients won't be able to connect through the peer-to-peer network---they'll have to use centralized services instead.
Many people and organizations volunteer to run full nodes using spare computing and bandwidth resources---but more volunteers are needed to allow Dogecoin to continue to grow. This document describes how you can help and what helping will cost you.
Running a Dogecoin full node comes with certain costs and can expose you to certain risks. This section will explain those costs and risks so you can decide whether you're able to help the network.
Miners, businesses, and privacy-conscious users rely on particular behavior from the full nodes they use, so they will often run their own full nodes and take special safety precautions. This document does not cover those precautions---it only describes running a full node to help support the Dogecoin network in general.
It's possible and safe to run a full node to support the network and use its wallet to store your Dogecoins, but you must take the same precautions you would when using any Dogecoin wallet. Please see the dogecoin core guide for more information.
Dogecoin Core full nodes have certain requirements. If you try running a node on weak hardware, it may work---but you'll likely spend more time dealing with issues. If you can meet the following requirements, you'll have an easy-to-use node.
Desktop or laptop hardware running recent versions of Windows, Mac OS X, or Linux.
50 gigabytes of free disk space, accessible at a minimum read/write speed of 100 MB/s.
2 gigabytes of memory (RAM)
A broadband Internet connection with upload speeds of at least 400 kilobits (50 kilobytes) per second
An unmetered connection, a connection with high upload limits, or a connection you regularly monitor to ensure it doesn't exceed its upload limits.
6 hours a day that your full node can be left running. (You can do other things with your computer while running a full node.) More hours would be better, and best of all would be if you can run your node continuously.
Note: many operating systems today (Windows, Mac, and Linux) enter a low-power mode after the screensaver activates, slowing or halting network traffic. This is often the default setting on laptops and on all Mac OS X laptops and desktops. Check your screensaver settings and disable automatic "sleep" or "suspend" options to ensure you support the network whenever your computer is running.
Legal: Dogecoin use is prohibited or restricted in some areas.
Bandwidth limits: Some Internet plans will charge an additional amount for any excess upload bandwidth used that isn't included in the plan. Worse, some providers may terminate your connection without warning because of overuse. We advise that you check whether your Internet connection is subjected to such limitations and monitor your bandwidth use so that you can stop Dogecoin Core before you reach your upload limit.
Anti-virus: Several people have placed parts of known computer viruses in the Dogecoin block chain. This block chain data can't infect your computer, but some anti-virus programs quarantine the data anyway, making it more difficult to run Dogecoin Core. This problem mostly affects computers running Windows.
Attack target: Dogecoin Core powers the Dogecoin peer-to-peer network, so people who want to disrupt the network may attack Dogecoin Core users in ways that will affect other things you do with your computer, such as an attack that limits your available download bandwidth.
Initial block download refers to the process where nodes synchronize themselves to the network by downloading blocks that are new to them. This will happen when a node is far behind the tip of the best block chain. In the process of IBD, a node does not accept incoming transactions nor request mempool transactions.
If you are trying to set up a new node following the instructions below, you will go through the IBD process at the first run, and it may take a considerable amount of time since a new node has to download the entire block chain (which is roughly 50 gigabytes now). During the download, there could be a high usage for the network and CPU (since the node has to verify the blocks downloaded), and the client will take up an increasing amount of storage space (reduce storage provides more details on reducing storage).
Before the node finishes IBD, you will not be able to see a new transaction related to your account until the client has caught up to the block containing that transaction. So your wallet may not count new payments/spendings into the balance.
If you are using Dogecoin Core GUI, you can monitor the progress of IBD in the status bar (left bottom corner).
The following instructions describe installing Dogecoin Core using tools
available in most mainstream Linux distributions. We assume you use a
Bourne-like shell such as bash.
Using any computer, go to the Dogecoin Core download page. Choose the appropriate file for your Linux install (either 32-bit or 64-bit) and download the file. If necessary, move the file to the computer you want to use to run Dogecoin Core.
If you aren't already logged into the computer you want to install Dogecoin on,
login now. Make sure you use an account that can use su or sudo to install
software into directories owned by the root user.
If you logged in graphically, start a terminal. If you logged in another way, we will assume you're already in a shell.
Locate the file you downloaded and extract it using the tar command followed
by the argument xzf followed by the file name. The argument xzf means
eXtract the gZipped tar archive File. For example, for a 64-bit tar archive in
your current directory, the command is:
tar xzf dogecoin-1.14.3-x86_64-linux-gnu.tar.gz
This will create the directory dogecoin-1.14.3 within your current working
directory. We will install the contents of its bin subdirectory into the
/usr/local/bin directory using the the install command. The install command
is part of the GNU coreutils available on nearly every Linux distribution, and
the /usr/local/bin directory is a standard location for self-installed
executables (you may edit the commands below to use a different location).
If you use sudo to run commands as root, use the following command line:
sudo install -m 0755 -o root -g root -t /usr/local/bin dogecoin-1.14.3/bin/*
If you use su to run commands as root, use the following command line:
su -c 'install -m 0755 -o root -g root -t /usr/local/bin dogecoin-1.14.3/bin/*'
To continue, choose one of the following options
To use Dogecoin Core Graphical User Interface (GUI), proceed to the Dogecoin Core GUI section below.
To use the Dogecoin Core daemon (Dogecoind), which is useful for programmers and advanced users, proceed to the Dogecoin Core Daemon section below.
To use both the GUI and the daemon, read both the GUI instructions and the daemon instructions. Note that you can't run both the GUI and the daemon at the same time using the same configuration directory.
In order to use Dogecoin Core GUI, you will need several libraries
installed. All of them should be available in all major
recently-released Linux distributions, but they may not be installed on
your computer yet. To determine whether you're missing any libraries,
open a terminal (if you haven't already) and run the command
/usr/local/bin/dogecoin-qt to start Dogecoin Core GUI.
If all the required libraries are installed, Dogecoin Core will start. If a required library is missing, an error message similar to the following message will be displayed:
/usr/local/bin/dogecoin-qt: error while loading shared libraries: libQtGui.so.4: cannot open shared object file: No such file or directory
Search your distribution's package database for the missing file
missing and install package containing that file. Then re-run
/usr/local/bin/dogecoin-qt to see if it's missing another file.
Repeat until Dogecoin Core GUI starts.
You will be prompted to choose a directory to store the Dogecoin block chain and your wallet. Unless you have a separate partition or drive you want to use, click Ok to use the default.
Dogecoin Core GUI will begin to download the block chain. This step will take at least several days, and it may take much more time on a slow Internet connection or with a slow computer. During the download, Dogecoin Core will use a significant part of your connection bandwidth. You can stop Dogecoin Core at any time by closing it; it will resume from the point where it stopped the next time you start it.
After download is complete, you may use Dogecoin Core as your wallet or you can just let it run to help support the Dogecoin network.
Optional: Start Your Node At Login
Starting your node automatically each time you login to your computer makes it easy for you to contribute to the network. The easiest way to do this is to tell Dogecoin Core GUI to start at login. This only works in desktop environments that support the autostart specification, such as Gnome, KDE, and Unity.
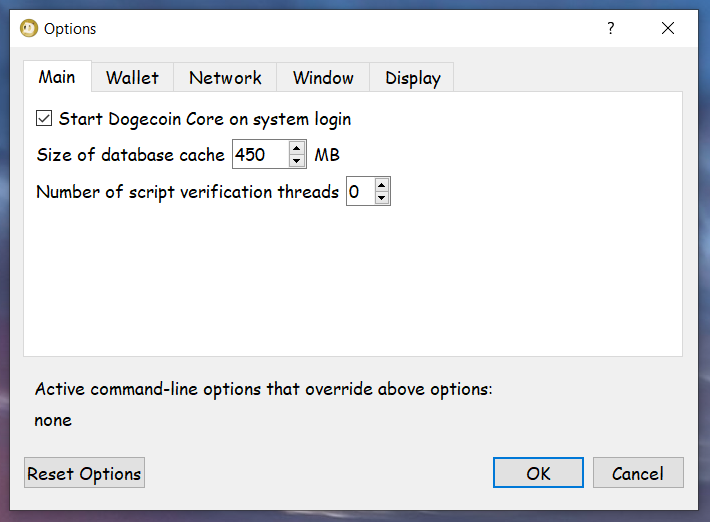
While running Dogecoin Core GUI, open the Settings menu and choose Options. On the Main tab, click Start Dogecoin on system login. Click the Ok button to save the new settings.
The next time you login to your desktop, Dogecoin Core GUI should be automatically started as an icon in the tray.
If Dogecoin Core GUI does not automatically start, you may need to add it
to an .xinit or .xsession file as described
here.
You have now completed installing Dogecoin Core.
To support the Dogecoin network, you also need to allow incoming connections. Please read the Network Configuration section for details.
If you're logged in as an administrative user with sudo access, you may log out. The steps in this section should be performed as the user you want to run Dogecoin Core. (This can be a locked account used only by Dogecoin Core.)
Type the following command:
dogecoind -daemon
It will print a message that Dogecoin Core is starting. To interact with
Dogecoin Core daemon, you will use the command dogecoin-cli (Dogecoin command
line interface).
Note: it may take up to several minutes for Dogecoin Core to start, during which it will display the following message whenever you use dogecoin-cli:
error: {"code":-28,"message":"Verifying blocks..."}
After it starts, you may find the following commands useful for basic
interaction with your node: getblockchaininfo, getnetworkinfo,
getnettotals, getwalletinfo, stop, and help.
For example, to safely stop your node, run the following command:
dogecoin-cli stop
When Dogecoin Core daemon first starts, it will begin to download the block
chain. This step will take at least several days, and it may take much more time
on a slow Internet connection or with a slow computer. During the download,
Dogecoin Core will use a significant part of your connection bandwidth. You can
stop Dogecoin Core at any time using the stop command; it will resume from the
point where it stopped the next time you start it.
Optional: Start Your Node At Boot
Starting your node automatically each time your computer boots makes it easy for you to contribute to the network. The easiest way to do this is to start Dogecoin Core daemon from your crontab. To edit your crontab on most distributions, run the following command:
crontab -e
Scroll to the bottom of the file displayed and add the following line:
@reboot dogecoind -daemon
Save the file and exit; the updated crontab file will be installed for you. On most distributions, this will cause Dogecoin Core daemon to be automatically started each time your reboot your computer.
If you're a expert system administrator and want to use an init script instead, see the init scripts directory in Dogecoin Core's source tree.
You have now completed installing Dogecoin Core.
To support the Dogecoin network, you also need to allow incoming connections. Please read the Network Configuration section for details.
Go to the Dogecoin Core download page and download the Dogecoin Core installer to your desktop.
After downloading the file to your desktop or your Downloads folder
(C:\Users\<YOUR USER NAME>\Downloads), run it by double-clicking its icon.
Windows will ask you to confirm that you want to run it. Click Yes and the
Dogecoin installer will start. It's a typical Windows installer, and it will
guide you through the decisions you need to make about where to install Dogecoin
Core.
To continue, choose one of the following options
If you want to use the Dogecoin Core Graphical User Interface (GUI), proceed to the Dogecoin Core GUI section below.
If you want to use the Dogecoin Core daemon (Dogecoind), which is useful for programmers and advanced users, proceed to the Dogecoin Core Daemon section below.
If you want to use both the GUI and the daemon, read both the GUI instructions and the daemon instructions. Note that you can't run both the GUI and the daemon at the same time using the same configuration directory.
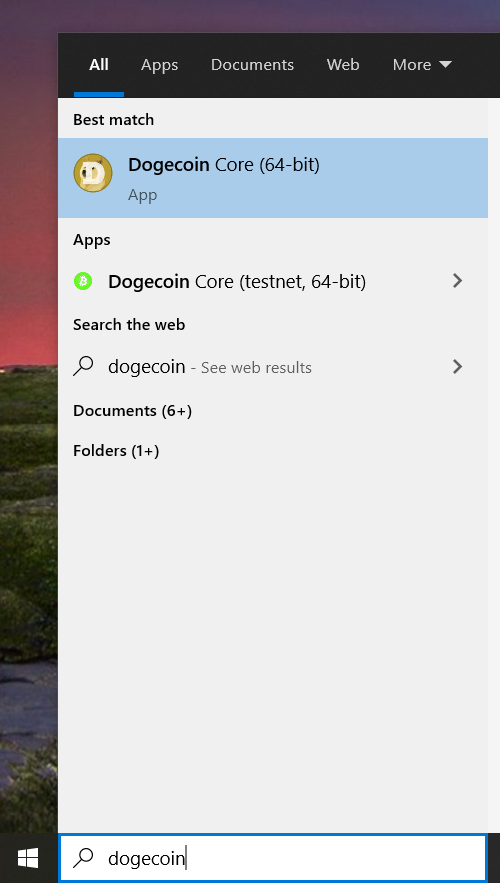
Press the Windows key and start typing "Dogecoin". When the Dogecoin Core icon appears (as shown below), click on it.
You will be prompted to choose a directory to store the Dogecoin block chain and your wallet. Unless you have a separate partition or drive you want to use, click Ok to use the default.
Your firewall may block Dogecoin Core from making outbound connections. It's safe to allow Dogecoin Core to use all networks. (Note: you will still need to configure inbound connections as described later in the Network Configuration section.)
Dogecoin Core GUI will begin to download the block chain. This step will take at least several days, and it may take much more time on a slow Internet connection or with a slow computer. During the download, Dogecoin Core will use a significant part of your connection bandwidth. You can stop Dogecoin Core at any time by closing it; it will resume from the point where it stopped the next time you start it.
After download is complete, you may use Dogecoin Core as your wallet or you can just let it run to help support the Dogecoin network.
Optional: Start Your Node At Login
Starting your node automatically each time you login to your computer makes it easy for you to contribute to the network. The easiest way to do this is to tell Dogecoin Core GUI to start at login.
While running Dogecoin Core GUI, open the Settings menu and choose Options. On the Main tab, click Start Dogecoin on system login. Click the Ok button to save the new settings.
The next time you login to your desktop, Dogecoin Core GUI will be automatically started minimized in the task bar.
Warning: to prevent data corruption, do not force shutdown of your computer from the Windows shutdown screen when you have Dogecoin Core running.
You have now completed installing Dogecoin Core.
To support the Dogecoin network, you also need to allow incoming connections. Please read the Network Configuration section for details.
To start Dogecoin Core daemon, first open a command window: press the Windows key and type "cmd". Choose the option labeled "Command Prompt".

If you installed Dogecoin Core into the default directory, type the following at the command prompt:
C:\Program Files\Dogecoin\daemon\dogecoind
Dogecoin Core daemon should start. To interact with Dogecoin Core daemon, you will
use the command dogecoin-cli (Dogecoin command line interface). If you
installed Dogecoin Core into the default location, type the following at the
command prompt to see whether it works:
C:\Program Files\Dogecoin\daemon\dogecoin-cli getblockchaininfo
Note: it may take up to several minutes for Dogecoin Core to start, during which it will display the following message whenever you use dogecoin-cli:
error: {"code":-28,"message":"Verifying blocks..."}
After it starts, you may find the following commands useful for basic
interaction with your node: getblockchaininfo, getnetworkinfo,
getnettotals, getwalletinfo, stop, and help.
For example, to safely stop your node, run the following command:
C:\Program Files\Dogecoin\daemon\dogecoin-cli stop
When Dogecoin Core daemon first starts, it will begin to download the block
chain. This step will take at least several days, and it may take much more time
on a slow Internet connection or with a slow computer. During the download,
Dogecoin Core will use a significant part of your connection bandwidth. You can
stop Dogecoin Core at any time using the stop command; it will resume from the
point where it stopped the next time you start it.
Optional: Start Your Node At Boot
Starting your node automatically each time your computer boots makes it easy for you to contribute to the network. The easiest way to do this is to start Dogecoin Core daemon when you login to your computer.
Start File Explorer and go to:
C:\ProgramData\Microsoft\Windows\Start Menu\Programs\StartUp
Right-click on the File Explorer window and choose New, then Text file.
Name the file start_dogecoind.bat. Then right-click on it and choose
Open in Notepad (or whatever editor you prefer). Copy and paste the
following line into the file.
C:\Program Files\Dogecoin\daemon\dogecoind
(If you installed Dogecoin Core in a non-default directory, use that directory path instead.)
Save the file. The next time you login to your computer, Dogecoin Core daemon will be automatically started.
Warning: to prevent data corruption, do not force shutdown of your computer from the Windows shutdown screen when you have Dogecoin Core running.
You have now completed installing Dogecoin Core.
To support the Dogecoin network, you also need to allow incoming connections. Please read the Network Configuration section for details.
Go to the Dogecoin Core download page and download the Dogecoin Core installer to your desktop.
After downloading the file to your Downloads folder
(/Users/<YOUR USER NAME>/Downloads), run it by double-clicking
its icon. OS X will open a Finder window for you to drag Dogecoin Core to your
Applications folder.
The first time running Dogecoin Core, Max OS X will ask you to confirm that you want to run it.
You will be prompted to choose a directory to store the Dogecoin block chain and your wallet. Unless you have a separate partition or drive you want to use, click Ok to use the default.
Dogecoin Core GUI will begin to download the block chain. This step will take at least several days, and it may take much more time on a slow Internet connection or with a slow computer. During the download, Dogecoin Core will use a significant part of your connection bandwidth. You can stop Dogecoin Core at any time by closing it; it will resume from the point where it stopped the next time you start it.
After download is complete, you may use Dogecoin Core as your wallet or you can just let it run to help support the Dogecoin network.
Optional: Start Your Node At Login
Starting your node automatically each time you login to your computer makes it easy for you to contribute to the network. The easiest way to do this is to tell Dogecoin Core GUI to start at login.
While running Dogecoin Core GUI, open the Dogecoin Core menu and choose Preferences. On the Main tab, click Start Dogecoin on system login. Click the Ok button to save the new settings.
The next time you login to your desktop, Dogecoin Core GUI will be automatically started minimized in the task bar.
You have now completed installing Dogecoin Core.
To support the Dogecoin network, you also need to allow incoming connections. Please read the Network Configuration section for details.
If you are running an older version, shut it down. Wait until it has completely shut down (which might take a few minutes for older versions), then run the installer (on Windows) or just copy over /Applications/Dogecoin-Qt (on Mac) or dogecoind/dogecoin-qt (on Linux).
The blockchain and wallet files in the data directory are compatible between versions so there is no requirement to make any changes to the data directory when upgrading. Occasionally the format of those files changes, but the new Dogecoin Core version will include code that automatically upgrades the files to the new format so no manual intervention is required.
Sometimes upgrade of the blockchain data files from very old versions to the new versions is not supported. In those cases it may be necessary to redownload the blockchain. Check the release notes of the new version if you are planning to upgrade from a very old version.
Sometimes downgrade is not possible because of changes to the data files. Again, check the release notes for the new version if you are planning to downgrade.
If you want to support the Dogecoin network, you must allow inbound connections.
When Dogecoin Core starts, it establishes 8 outbound connections to other full nodes so it can download the latest blocks and transactions. If you just want to use your full node as a wallet, you don't need more than these 8 connections---but if you want to support lightweight clients and other full nodes on the network, you must allow inbound connections.
Servers connected directly to the Internet usually don't require any special configuration. You can use the testing instructions below to confirm your server-based node accepts inbound connections.
Home connections are usually filtered by a router or modem. Dogecoin Core will request your router automatically configure itself to allow inbound connections to Dogecoin's port, port 22556. Unfortunately many routers don't allow automatic configuration, so you must manually configure your router. You may also need to configure your firewall to allow inbound connections to port 22556. Please see the following subsections for details.
For confirmation that you accept inbound connections, you can use Dogecoin Core. Dogecoin Core can't tell you directly whether you allow inbound connections, but it can tell you whether or not you currently have any inbound connections. If your node has been online for at least 30 minutes, it should normally have inbound connections. If want to check your peer info using Dogecoin Core, choose the appropriate instructions below:
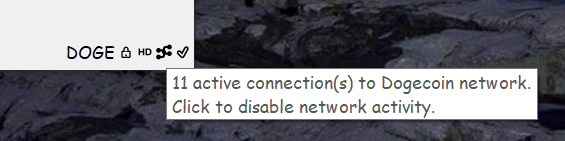
In the bottom right corner of the Dogecoin Core GUI are several icons. If you hover over the network nodes icon, it will tell you how many connections you have. The icon won't be fully filled in until you have more than 8 active connections, which only happens if inbound connections are allowed.
For confirmation, you can go to the Help menu, choose Debug Window, and open the Information tab. In the Network section, it will tell you exactly how many inbound connections you have. If the number is greater than zero, then inbound connections are allowed.

If you don't have inbound connections, please read the instructions for enabling inbound connections.
The getconnectioncount command will tell you how many connections you have. If you have more
than 8 connections, inbound connections are allowed. For example:
$ dogecoin-cli getconnectioncount
10
For confirmation, you can use the getpeerinfo command to get
information about all of your peers. Each peer's details will include
an inbound field set to true if the connection is inbound. If you
have any inbound connections, then inbound connections are allowed.
If you don't have inbound connections, please read instructions for enabling inbound connections.
If Dogecoin Core can't automatically configure your router to open port 22556, you will need to manually configure your router. We've tried to make the following instructions generic enough to cover most router models; if you need specific help with your router, please ask for help on a tech support site such as SuperUser.
Enabling inbound connections requires two steps, plus an extra third step for firewall users:
Giving your computer a static (unchanging) internal IP address by configuring the Dynamic Host Configuration Protocol (DHCP) on your router.
Forwarding inbound connections from the Internet through your router to your computer where Dogecoin Core can process them.
Configuring your firewall to allow inbound connections. This step mainly applies to Windows users, as Mac OS X and most Linuxes do not enable a firewall by default.
In order for your router to direct incoming port 22556 connections to your computer, it needs to know your computer's internal IP address. However, routers usually give computers dynamic IP addresses that change frequently, so we need to ensure your router always gives your computer the same internal IP address.
Start by logging into your router's administration interface. Most routers can be configured using one of the following URLs, so keep clicking links until you find one that works. If none work, consult your router's manual.
Upon connecting, you will probably be prompted for a username and password. If you configured a password, enter it now. If not, the Router Passwords site provides a database of known default username and password pairs.
After logging in, you want to search your router's menus for options related to DHCP, the Dynamic Host Configuration Protocol. These options may also be called Address Reservation.
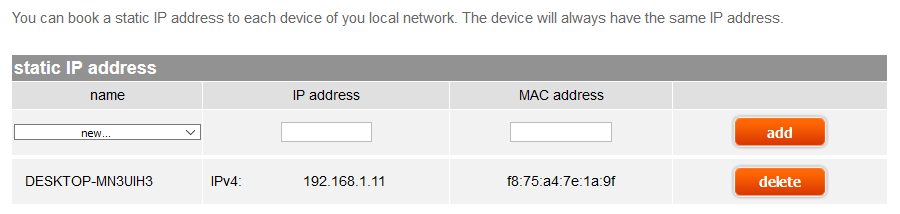
In the reservation configuration, some routers will display a list of computers and devices currently connected to your network, and then let you select a device to make its current IP address permanent:
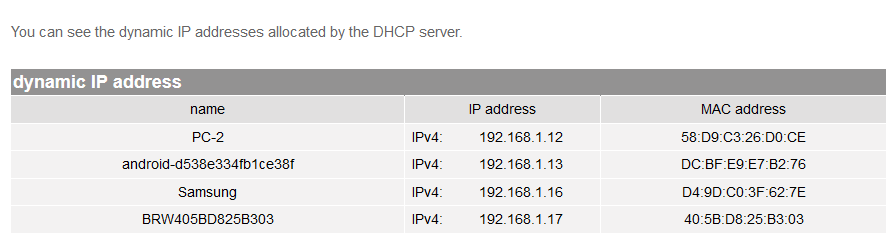
If that's the case, find the computer running Dogecoin Core in the list, select it, and add it to the list of reserved addresses. Make a note of its current IP address---we'll use the address in the next section.
Other routers require a more manual configuration. For these routers, you will need to look up the fixed address (MAC address) for your computer's network card and add it to the list. This operation differs by operating system:
cmd to open the console. Type ipconfig /all and
find the result that best matches your connection---usually a wireless
connection. Look for a line that starts with "Physical Address" and
contains a value like this:Physical Address. . . . . . . . . : 01-23-45-67-89-AB
Replace all the dashes with colons, so the address looks like this: 01:23:45:67:89:AB. Use that address in the instructions below.
ifconfig. If you get a message
saying "command not found" or similar, you'll need to install net-tools
using the following commands:For Debian/Ubuntu:
sudo apt update
  sudo apt install net-tools
For Fedora, CentOS, or RHEL
sudo dnf update
  sudo dnf install net-tools
Once net-tools is installed, type ifconfig in your terminal and
press enter. Find the result that best matches your connection---a
result starting with wlan indicates a wireless connection. Find
the field that starts with HWaddr and copy the immediately following
field that looks like 01:23:45:67:89:ab. Use that value in the
instructions below.
ifconfig. Find the result
that best matches your connection---a result starting with en1
usually indicates a wireless connection. Find the field that starts
with ether: and copy the immediately following field that looks like
01:23:45:67:89:ab. Use that value in the instructions below.Once you have the MAC address, you can fill it into to your router's manual DHCP assignment table, as illustrated below. Also choose an IP address and make a note of it for the instructions in the next subsection. After entering this information, click the Add or Save button.
Then reboot your computer to ensure it gets assigned the address you selected and proceed to the Port Forwarding instructions below.
For this step, you need to know the local IP address of the computer running Dogecoin Core. You should have this information from configuring the DHCP assignment table in the subsection above.
Login to your router using the same steps described near the top of the DHCP subsection. Look for an option called Port Forwarding, Port Assignment, or anything with "Port" in its name. On some routers, this option is buried in an Applications & Gaming menu.
The port forwarding settings should allow you to map an external port on your router to the "internal port" of a device on your network as shown in the screenshot below.
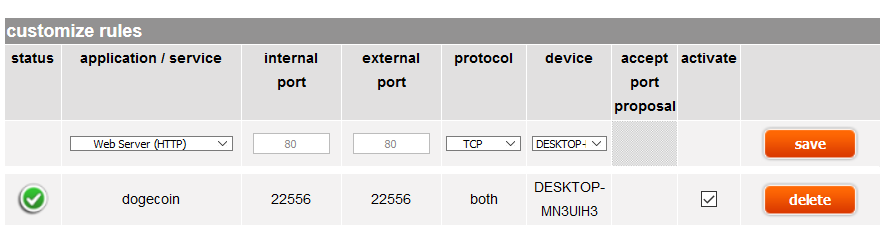
Both the external port and the internal port should be 22556 for Dogecoin. Make sure the IP address you enter is the same one you configured in the previous subsection.
After filling in the details for the mapping, save the entry. You should not need to restart anything. Start Dogecoin Core (if you haven't already) and follow the Testing Connections instructions to test your connection.
If you still can't connect and you use a firewall, you probably need to change your firewall settings. See the Firewall section below.
If something else went wrong, it's probably a problem with your router configuration. Re-read the instructions above to see if you missed anything, search the web for help with "port forwarding", and ask for help on sites like SuperUser.
We can't provide direct support, but if you see a way to improve these instructions, please open an issue.
Firewalls block inbound connections. To use Dogecoin, you need to configure your computer's firewall to allow connections to port 22556. This is usually as easy as starting your firewall configuration software and defining a new rule to allow inbound connections to port 22556. For additional information for Windows, see the links below:
Mac OS X comes with its firewall disabled by default, but if you have enabled it, see the section Allowing Specific Applications from the official Apple guide.
Ubuntu also comes with its firewall disabled by default, but if you have enabled it, see the Ubuntu wiki page for information about adding port forwarding rules.
Once you have allowed inbound connections to port 22556, start Dogecoin Core (if you haven't already) and follow the Testing Connections instructions to test your connection.
If something else went wrong re-read the DHCP, port forwarding, and firewall instructions above to see if you missed anything, search the web for help with "port forwarding" and "opening firewall ports", and ask for help on sites like SuperUser.
We can't provide direct support, but if you see a way to improve these instructions, please open an issue.
This section contains advice about how to change your Dogecoin Core configuration to adapt it to your needs.
There are two ways to change your configuration. The first is to start Dogecoin Core with the options you want. For example, if you want to limit it to using one CPU core for signature verification, you can start Dogecoin Core like this:
### Dogecoin Core daemon
dogecoind -par=1 -daemon

### Dogecoin Core GUI
dogecoin-qt -par=1
Once you've decided you like an option, you can add it to the Dogecoin Core configuration file. You can find that file in the following directories:
Windows: %APPDATA%\Dogecoin\
OSX: \$HOME/Library/Application Support/Dogecoin/
Linux: \$HOME/.dogecoin/
To add an option to the configuration file, just remove its leading
dash. You may also need to remove any quotation marks you used in your shell.
For example, the -par option seen above would look like this in the
configuration file:
par=1
If you have any questions about configuring Dogecoin Core, please stop by our subreddit.
It is possible to configure your node to to run in pruned mode in order to reduce storage requirements. This can reduce the disk usage from over 50GB to around 5GB.
Running a node in pruned mode is incompatible with -txindex and -rescan. It
also disables the RPC importwallet. Two RPCs that are available and
potentially helpful, however, are importprunedfunds and removeprunedfunds.
To enable block pruning set prune=N on the command line or in dogecoin.conf,
where N is the number of MiB to allot for raw block and undo data.
A value of 0 disables pruning. The minimal value above 0 is 550. Your
wallet is as secure with high values as it is with low ones. Higher values
merely ensure that your node will not shut down upon blockchain reorganizations
of more than 2 days - which are unlikely to happen in practice. In future
releases, a higher value may also help the network as a whole because stored
blocks could be served to other nodes.
Some node operators need to deal with bandwidth caps imposed by their ISPs.
By default, Dogecoin Core allows up to 125 connections to different peers, 8 of which are outbound. You can therefore have at most 117 inbound connections.
The default settings can result in relatively significant traffic consumption.
Ways to reduce traffic:
-maxuploadtarget=<MiB per day>
A major component of the traffic is caused by serving historic blocks to other nodes during the initial blocks download phase (syncing up a new node). This option can be specified in MiB per day and is turned off by default. This is not a hard limit; only a threshold to minimize the outbound traffic. When the limit is about to be reached, the uploaded data is cut by no longer serving historic blocks (blocks older than one week). Keep in mind that new nodes require other nodes that are willing to serve historic blocks. The recommended minimum is 144 blocks per day (max. 144MiB per day)
-listen=0
Disabling listening will result in fewer nodes connected (remember the maximum of 8 outbound peers). Fewer nodes will result in less traffic usage as you are relaying blocks and transactions to fewer nodes.
-maxconnections=<num>
Reducing the maximum connected nodes to a minimum could be desirable if traffic limits are tiny. Keep in mind that Dogecoin's trustless model works best if you are connected to a handful of nodes.
-blocksonly
Causes your node to stop requesting and relaying transactions unless they are part of a block and also disables listening as described above.
This reduces your node's bandwidth to the absolute minimum necessary to stay synchronized with the network, about 150 megabytes incoming data per day and about 1 megabyte of outgoing data per day, but it does mean that your node won't see incoming transactions until they've received at least one confirmation.
You will still be able to send transactions from the built-in wallet or from
peers you've whitelisted using the -whitelist parameter.
This work, "Running A Dogecoin Full Node", is a derivative of "Running A Dogecoin Full Node", used under MIT License (MIT) available on https://opensource.org/licenses/MIT.
"Running A Dogecoin Full Node" is licensed under MIT License (MIT) available on https://opensource.org/licenses/MIT by DogecoinIsAwesome.com ↩